Every transaction entered into Fundriver must be connected to a fund. Funds are created in Fundriver during the implementation process (using the Data Load Template), but additional funds will likely need to be added as new gifts are received.
Need to add a bunch of new funds? Check out our Bulk Import Feature!
To add a new fund, go to ORGANIZE > FUNDS, click on the green ADD FUND button.

Populate the Fund Profile with information about your fund, including Name, GLID, etc.

Choose an INVESTMENT POOL for your new fund.

Choose a NET ASSET CLASSIFICATION based on the donor-imposed restriction (if applicable).
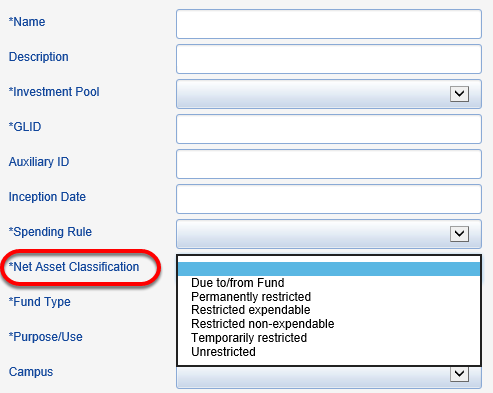

Enter fund use restriction and any notes you would like pulled into donor reporting into the fields shown below.

Populate other Fund Profile fields as necessary with your organization-specific information.

Populate the Fund Profile with information about your fund, including Name, GLID, etc.
*The fields marked with an asterisk are considered required fields.
Choose an INVESTMENT POOL for your new fund.
Choose a NET ASSET CLASSIFICATION based on the donor-imposed restriction (if applicable).
Please Note: If you are adding an Expendable Fund, the Net Asset Classification will be automatically populated with your organization's Expendable net asset type.
DUE TO/DUE FROM funds do not participate in the investment pool. Check out this article for all the details!
Enter fund use restriction and any notes you would like pulled into donor reporting into the fields shown below.
Populate other Fund Profile fields as necessary with your organization-specific information.
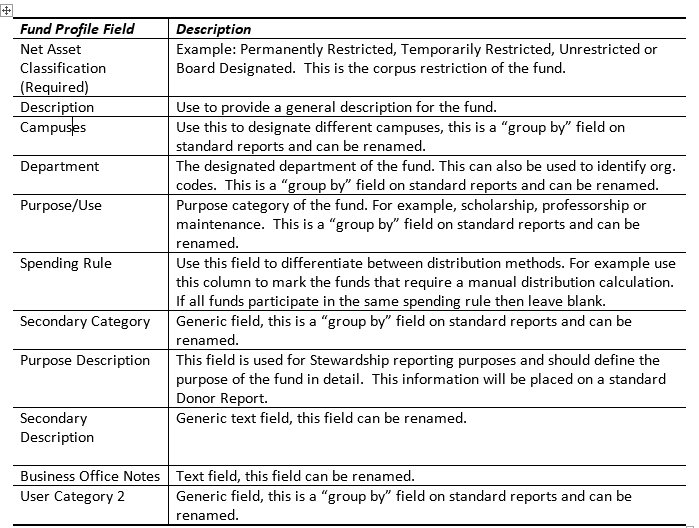
See the Fund Profile definitions below for guidance on definitions for each category listed. Optional categories are important to populate properly for report grouping and filtering purposes. To learn how to make additions to these tables, please see the "How do I populate the fund profile drop down?" training for instructions.
FUND PROFILE field definitions:
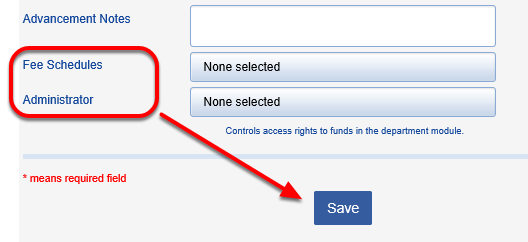
Select a fee schedule and administrator, if applicable. SAVE the fund.The Fund, Project, Program, Dept., Campuses, Department, Purpose/Use, Secondary Category, Secondary Description, Business Office Notes and User Category 2 column headings can be renamed in Fundriver. If you want to rename these fields be sure to let your implementation specialist know.