Find everything you need to know about the User Defined Reporting Tool in this article. This tool is easy to use and versatile.
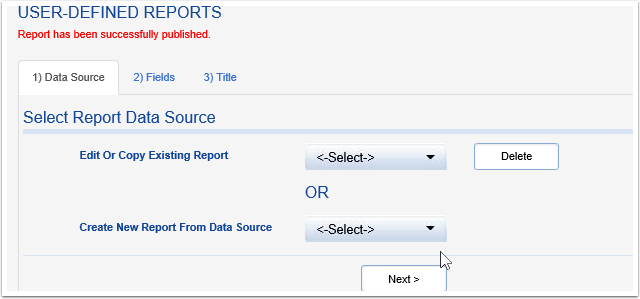
Navigate to Report > User-Defined Reports; users can select to
EDIT OR COPY EXISTING REPORT or
CREATE NEW REPORT FROM DATA SOURCE.
To create a New Report, choose from these standard data sources:
For a complete list of fields available in the Standard Data Sources, click
here!
On the 2) Fields tab, users can add fields, add sort, group, and filter by parameters.
The first accordion allows the user to select fields to display on the report. Depending on the data source that was chosen on the first tab, all available fields to select from will be automatically populated.
There's an option to select and delete all fields so the user can start from scratch if they'd like.
Here the user can also click Add Field to choose specific fields to add to the report. This drop down list of available fields will appear.
Once the user chooses a field from the drop down, the required fields (Label, Width, Decimal) populate automatically.
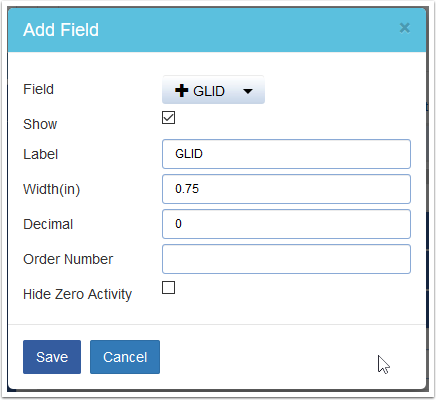
Users have the ability to change Field Labels in this window. Users can also select the Hide Zero Activity checkbox, this will hide a column if there are zeroes in all rows.
To reorder the columns, click the number corresponding with the field and move the cursor to the desired location - wait for the blue bar to show up and click to drop the field into the new location.
The second accordion allows the user to choose sort options for the report.
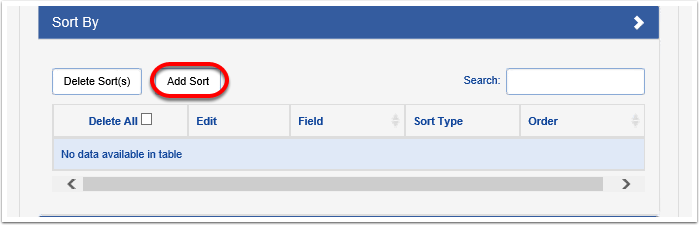
Choose from the drop down different fields to sort the report by.
For fields that do not have the check option for selecting multiple values, the user will need to type out the value(s) and use a comma for separating multiple values.
For example, when setting up a filter on GLID with multiple values, the user will need to enter the text: 100,101,102. This will build a filter with the 3 GLIDs referenced.
The third accordion allows the user to choose group options for the report.
For fields that do not have the check option for selecting multiple values, the user will need to type out the value(s) and use a comma for separating multiple values.
For example, when setting up a filter on GLID with multiple values, the user will need to enter the text: 100,101,102. This will build a filter with the 3 GLIDs referenced.

Choose from the drop down different fields to group the report by.
The fourth accordion allows the user to choose filter options for the report.
*Please Note: There is a section under the Reports tab which allows the user to create a stand alone filter that can be applied to standard reports and user defined reports when they are run. For more information on the Manage Filters feature check out this article.
For fields that do not have the check option for selecting multiple values, the user will need to type out the value(s) and use a comma for separating multiple values.
For example, when setting up a filter on GLID with multiple values, the user will need to enter the text: 100,101,102. This will build a filter with the 3 GLIDs referenced.
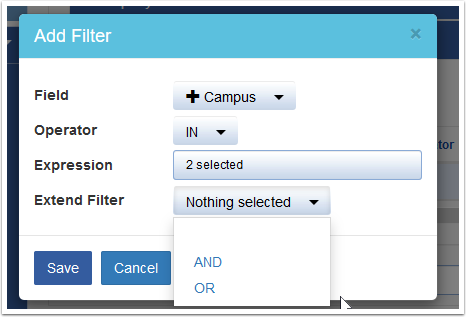
Choose from the drop down different fields to filter the report by.
Through this filter option the user is able to add Operators and/or Expressions as well.
Selecting IN will populate a drop down to select specific items to filter IN to the report.
Selecting NOT IN will populate a drop down to select specific items to filter NOT IN to the report (or to exclude from the report).
Selecting LIKE will populate a text field where the user can enter a key word or part of a word to filter into the report.
To add more than one filter the user will be given options for AND or OR under the Extend Filter drop down. There is no limit to the number of filters that can be added.
On the Title tab, users can title the reports. This page defaults to "Save as new report" unless the user chooses to edit an existing report on the Data Source tab.

On this tab, users can also choose the Report Lock button which prevents any other user from modifying this specific report- only the creator will have the access to do so.
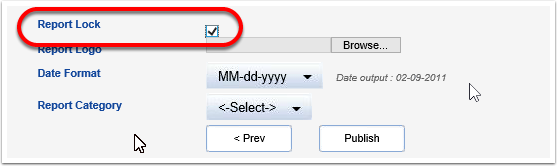
Users can upload logos by clicking Browse on the Report Logo line.
There are also a number of different formats the user can choose to have the date display as. Please note: the date will display in the footer (run date) and in the header (selected report dates) however this format is selected.
Click the dropdown in Report Category to choose a folder to save the report to.
Once the user clicks Publish, this page is displayed.
To view the report which was created; navigate to the corresponding folder and the reports will be listed alphabetically.


